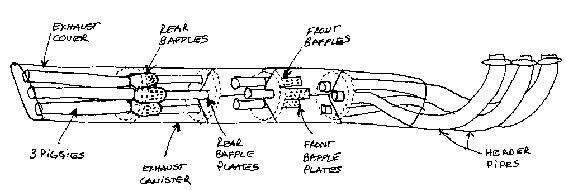
Rear Baffles
Drill
After some research, it is
recommended to proceed with the next step in the other page, the "Ragnar
Cut", before this drilling the front baffles. There will be more
sound level impact by performing the "Ragnar Cut" and there
will be no shimming nor re-jetting required. Also, after taking out the
rear bafflex completely, will be a lot easire to drill the front baffles
if you still decide to go ahead with this modification.
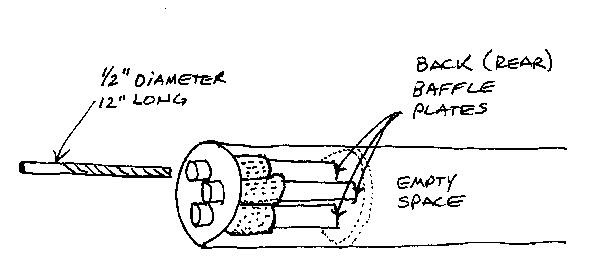
This process will not
require any carburetor modifications nor re-jetting.
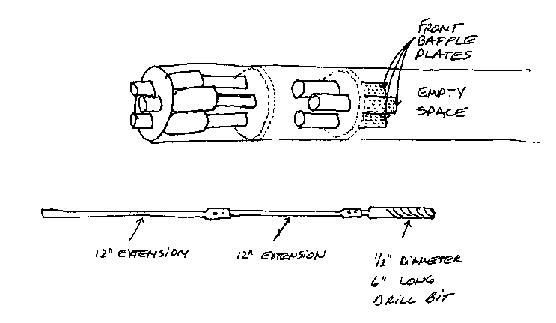
This involves
drilling the Front Baffle Plates. To do it, you will need a very long
drill bit, at least 20" long. Since it is very hard to find, I'll
show you my idea. It consist of attaching together two drill bit
12" extensions that are very easy to find on any hardware store.
Please be sure that the connection is very strong since we don't want
any piece to drop inside the Canister. Once both pieces are tight
together, insert a 6" long 1/2" diameter drill bit at the end.
With this new
hardware, insert it through the Rear Baffle holes until reaching the
Front Baffle Plates. Follow the previous procedure very careful and step
by step. You will experience a little louder, deeper and throatier
sound. You will agree with me that there is no BIG difference but many
people stops here. I did not.
 ShopTalk