Hitch Doc & Trailer Harness Installation
by Don Kuhlman
We installed a Hitch Doc trailer hitch on my Valk. As I now also have a set
of Tourer hardbags (thanks Jim!), there’s a lot of hardware to hang out back.
A helper is definitely recommended!
The only assembly problem encountered, in addition to the usual fender bolt
happiness, was the two front (big) fender bolts supplied by Hitch Doc were ¼"
too long. On my fender at least, the two captive nuts are not threaded all the
way through and the bolts would bottom before everything was tightened up. It
was easy enough to fix by cutting approximately 4 threads off with a Dremel
tool and cutoff wheel and then redressing the end of the bolt over at the
bench grinder. Be sure to run a nut or die down the bolt first to chase and
clean up the threads afterwards. I suppose you could finish tapping out the
fender nuts as well, but I didn’t have the right size tap and didn’t want the
bolts sticking through the inside of the fender.
To begin, it’s easiest to remove the seat(s) and separate the fender halves
to work on them. The front portion of the wiring harness is under the right
side cover and uses individual male/female wiring connectors. The rear portion
of the fender has a special connector that separates it from the front section
of the fender. Pinch in on the release clip and pull the halves apart to
separate. Remove the license plate, license plate bracket, and then the turn
signal bracket. It is held on by two nuts on the underside of the rear fender
section. As you pull the turn signal bracket loose, you’ll find more
individual wire connections that need to be disconnected. Don’t worry as
they’re all color coded.
TIP: Use a pair of needle nose pliers to gently grasp the individual plug
and socket at the base of the connector for removing and installing. Don’t
pull on the wires themselves. When reinserting, make sure they are fully
seated. If the connection seems loose, gently squeeze the outside of the
socket or female half of the connection with the pliers to tighten them up.
For a wiring harness, I’m using a standard 5-wire molded harness available
at most auto parts stores. I’ve found them to be much easier to install and to
be more reliable than the older style chrome systems where the wires screw
into the pins. Besides, mine is hidden behind the license plate when not in
use. I also always carry the ground through as I find it to be a much more
reliable method than trying to rely on the trailer ball connection.
All of the wiring connections you’ll need, except one, are available at the
license plate/turn signal bracket. You will only need to run an additional
wire for the brake light. This will be the green wire with the yellow stripe.
I broke into the harness at the gray connector that goes between the two
fender halves at the back half. This way I can still unplug the harness and
split the fender as normal. I cut the wire and added a length of 14 gage wire
that was long enough to run back to the license plate bracket. I used a
mechanical splice AND soldered it as well as this connection also runs the
normal brake light. The rest of the connections were all done with normal
mechanical connectors.
After the wire is installed and the splice is properly insulated (use heat
shrink or plastic tubing and electrical tape), carefully pull the wire harness
running down to the license plate bracket out of the guide under the fender.
Run your new extra brake light wire in the guide and then reinstall the
harness to hold everything in place.
Next, you’ll need to drill a hole in the back of the turn signal bracket so
that the trailer harness wires can be installed. Be careful as it’s made out
of chrome plated plastic. I used a 3/8" hole. I also installed a Back Off LED
license plate frame and ran its three wires through the same hole. You’ll need
to notch the license plate to clear the wires as they come through the back of
the frame. I also ran both the Back Off wiring and the trailer harness through
flexible plastic tubing to give them a bit more protection and to provide a
more finished appearance. Then, where they come through the turn signal
bracket, I’ve installed a plastic tyrap on the inside to provide some strain
relief. I also found that I needed to remove the bendable wire clamp from the
inside of the turn signal bracket to provide enough room for all the
connectors. Some pliers and twisting did the trick here.
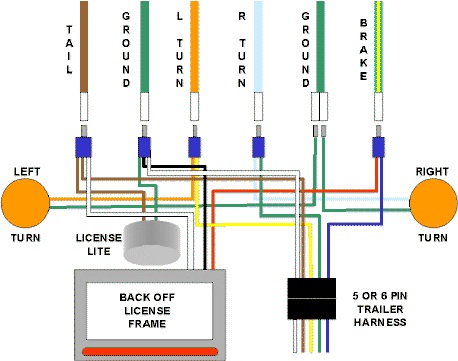
The actual wiring scheme is straight forward. For the trailer harness, it’s
brown for tail or running lights, yellow for left turn signal, green for
right, white is ground and use the blue for the brake light circuit. The Back
Off LED uses black for ground, white for tail or running, and red for brake
light. Put a female connector on the new brake light wire you just added. Make
it the same length as the rest of the rear fender harness.
At the turn signal bracket, you’ll need to cut the ends off the blue and
orange turn signal wires (leave their green ground wires intact) and the brown
and green wires from the license plate light. Cut the wires right at the
factory connectors to preserve as much wire as possible. Then strip and join
the necessary wires using new male connectors. The "blue" size crimp
connectors are large enough to get all the wires in them and will still fit
into the female sockets on the factory harness.
Join the red Back Off wire and the blue trailer harness and put them into a
male crimp connector. This will be the brake light circuit. Join the orange
turn signal and yellow trailer harness. The green trailer harness and the
light blue turn signal wire then go together. Join the green license plate
light, the black Back Off and the white trailer harness wire together. This is
the ground for everything except the turn signals. Their green ground wires
plug back into the green double female connector on the harness. Then join the
brown license plate light, brown trailer harness and white Back Off wires.
This will be the tail or running light circuit. Then everything plugs back in
following the color code for all the Honda wires with the exception of the new
brake light circuit. And the neat thing is you can unplug everything and
remove the turn signal and license plate bracket by just unplugging the
connections.
 ShopTalk