|
 ShopTalk
|
Because these pages may move to other servers
from time to time, we have put this information on our server for all to
view. If you are the original author, and you have a problem with that,
please contact us and we will remove this page.
Please checkout the "Original Authors"
web page.
|
Removing the
Valkyries Smog
Removing the smog equipment
is not recommended! This is only to be used for reference.
Important Update!
Please read below!
CA De-Smog notes by Tim Skelton
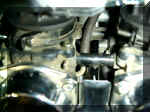
Well, one day I decided I was tired of
chasing down vacuum leaks and I was getting some popping that could be related
to the PAIR valves. I found out that Two Brother's Racing had come up with a
smog kit for the Valk. Well, after jetting my bike and dealing with all the
different hoses and valves I thought wow, this would be worth a $100.00 just to
find out what to take off and what to leave on. It is a real nightmare in there.
Let me just say at this point that TBR was
one of the first ones to come up with anything new for the Valk and they still
have some of the best products on the market for the Valk. This is not one of
them. It's not that the product is so bad as much as there is very little help
as far as instructions. After talking to Craig at TBR I can see why he won't go
into great detail on his kits. I guess that if he says turn this screw out 1.5
turns and it takes 1.75 turns then people call him all day telling him why his
instructions are wrong. Being that as it is he does say on the first line that
if you don't feel comfortable with removing your smog then take it to your
dealer. There are two problems with that, one is you don't read that till after
you have bought the kit, and two, most dealers won't remove the smog on a bike.
So , what I have done is put this together so if you did buy the kit you can put
this on yourself. It's not that bad if you have some help like this.
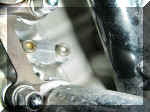
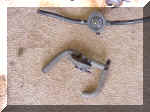
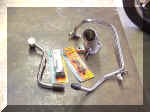
As you can see here what you get for your
$100.00 is four of the round plugs and two of the flat plugs. You also get four
screws that are just for looks,and a allen wrench. The round plugs have clear
tape on them to hold in these little pins that push out when you turn the allen
set screw. The reason the tape is there is because the pins will fall out if it
didn't have the tape on. How do I know that? You guessed it. I lost one of the
pins right off the bat and had to take some welding rod and make a new one. It
took forever just to get the goop off that the tape left behind. I am told that
if you use some carb cleaner that will help. These parts are not chromed or
polished. They are just cut down raw material. If that wasn't bad enough the
directions were totally useless.
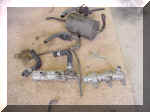
From here it was rip and tear and hope my
bike ran when I was done. The one thing that was hard to figure out was what to
plug and what to leave open. By the way TBR's kit is short four rubber plugs for
the intakes and one hose that goes to the gas tank. Even if I did have good
direction's I still would have had to make a run to the parts store.
Now here is the good news. I figured out
how to do this kit for about $10.00. That doesn't help me at this point but it
will help you. Here is a step by step on what to take off and what to plug. With
PICS!
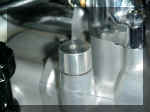
You start by pulling all the valves off and
the evap can.
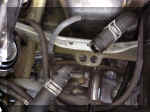
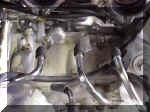
This is what it should look like when all
of the smog is gone.
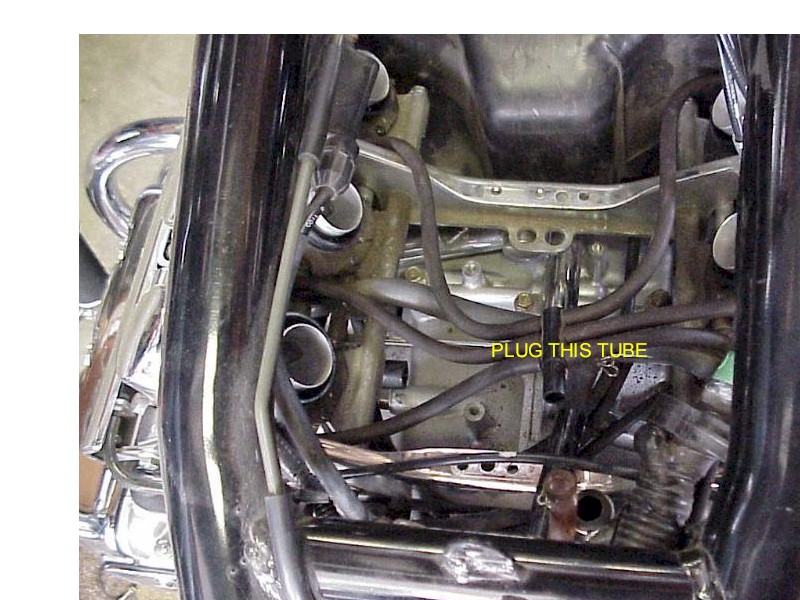
The six hoses that you see
on top are not the overflow hoses like I thought. They are purge tubes on CA
bikes only. Three of us were able to run with this unplugged with no effect on
performance. One guy couldn't get his bike to rev over 3K with this unplugged.
Another guy lost power and had a terrible dyno chart because of leaving this
unplugged. We took one bike that didn't seem to be effected by leaving this
unplugged and went ahead and plugged it, it did not effect it one way or the
other, so it is now our recommendation to go ahead and plug this. It is still a
mystery why this did not effect my bike when this was left up plugged. I
apologize for any bad information I may have given you about these tubes but I
had no other data that told me this was a problem.
There are six hoses at the bottom of the
carbs that are your drain hoses. You can take those off too if you want. I left
mine on.
The other two big hoses that go to each
carb bank are your fuel supply. I would leave those on if I were you.
Now, what to plug and what to hook up.

There is a tube that is about 3/8" in size
on both carb banks. DO NOT plug this! How do I know that? You guessed it again
didn't you? This was the only big mistake I made on the whole deal....besides
buying the kit that is, this is a carb vent tube, it needs to be open or not
only will it not run right but when you go to pull the caps off of the back of
your intakes it will puke fuel all over the place. That was my first clue I did
something wrong. What I did is just swiveled it down.
Now here is where your $10.00 comes in. I
should at least get a dinner out of someone for this. Go down to your parts
store and buy six 3/8" rubber plugs and four 1/8" rubber plugs. The 1/8" plugs
are for your intakes and the 3/8" plugs are for your chrome tubes that use to go
to your PAIR valve. While you are at the store pick up a couple feet of tube
that is just over 1/8". This is the only hose that you will be hooking back up.
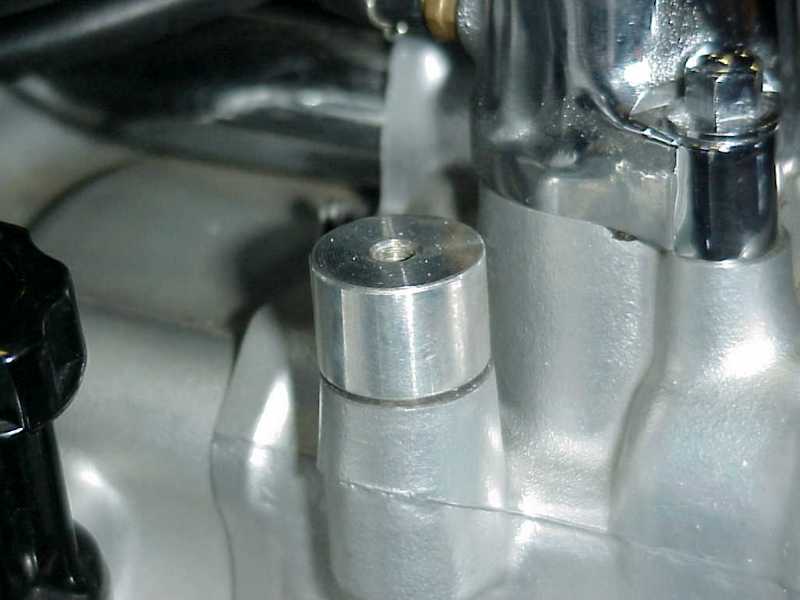
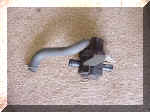
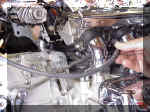
You don't need to pull the chrome tubes
off, this is just so you can see it better. To me the tubes don't look bad, if
you want you could try and locate a plug to replace the one that TBR sells and
just make a cap plate for the bottom one. That is what Chuck B. did. This is the
down and dirty way and it looks and works just fine. Once you get the carbs back
on you can hardly see the tubes. But there is a big difference when you look
inside and all that junk is gone. By the way some people think that only the CA
bikes have this junk on it, take a look in your bike and you will see that you
have the PAIR valves and lots of hoses.
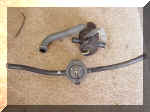
This is where you want to hook up the tube
you had to buy at the store. You know the one that doesn't come with the kit.
This tube is where you pick up vacuum for your gas tank. Just pull the one hose
off and stick the new one on and hook it back to the tank.
I guess that's about it. All the tubes that
come off of the crankcase stay on and hook back into your air box.
What you may find after doing this mod is
you may be running a little leaner now. You can take some of that out by
adjusting your pilot screws out but to do it right you should rejet. We did
Brad's bike last night and went ahead and rejetted and the thing runs GREAT! The
good news is jetting is a piece of cake now that all that stuff is gone. Took me
two hours to change the mains, slow jets and take out the shims.
The next thing I will have for you is how
to jet your bike. I have the pics I just need to write it all down. Hope this
helps and if I can help you with anything let me know.
ValkyrieRiders.com
Message Board
ShopTalk
Just Pics
Valkyrie Hot Links