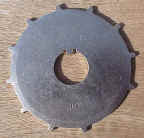
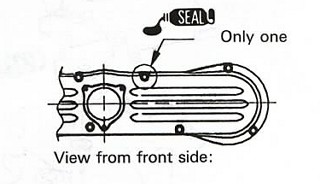
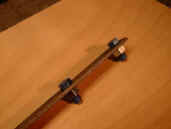
ShopTalk gears.gif (7834 bytes)

Because these pages may move to other servers from time to time, we have put this information on our server for all to view. If you are the original author, and you have a problem with that, please contact us and we will remove this page.
Please checkout the "Original Authors" web page.


Timing Wheel Installation

4 degree wheel is recommended for the Valkyrie Interstate and Gold Wing- 6 degree wheel is recommended for the standard and tourer Valkyrie! 91octane or better is recommended when advancing the timing. Some bikes can get away with more advance than others. This is only a recommendation.

Please Read the entire page before install!


Additional Pics

   Installation is pretty straight forward, but there is a thing or two you should know.
If you do not feel that you have mechanical ability, then take the installation instructions to your local dealer for installation. You can damage your valves if you do not install the trigger wheel properly! 

  • First thing you want to do is remove the dust cover and keep track of where the bolts went. There is one bolt on the top right facing the bike that has some sealant on it. That one comes out a little harder than the rest.  


  • Then you want to put a wrench on the crank bolt and turn the crank counterclockwise until the T1.2 mark on the drive pulley lines up with the index mark on the crankcase. The "UP" marks on the driven pulleys should be facing up and should line up with the marks on the case.


  • Next you want is to put the bike in 5 th gear and have someone stand on the rear brake while you loosen the crank bolt. This works well and is less likely to damage the timing belt. If you are by yourself you can use a pair of pliers and a big screwdriver to hold the driven pulley while you loosen the crank bolt. Or you can build your own tool just like Cruisin Dave did. The crank bolt loosens just like any other bolt ( counterclockwise )


Cruisin Dave's Tool

MVC-892L.JPG (98233 bytes)

  • Now that you have the crank bolt loose, go ahead and loosen up the tensioner on the left side facing the bike.  Pull the crank bolt off and pull the timing plate off. Pull up on the tensioner and remove timing belt and drive pulley.

   MVC-891L.JPG (80740 bytes)    MVC-892L.JPG (98233 bytes)

  • Your now ready to swap out the timing wheel. Pull the old one off and install the new one so that you can read "OUT" on the wheel. This wheel is not the same but you will see what I'm saying when you get yours.


  • Reinstall the pulley and belt making sure that all your marks line up. It is real easy to get one tooth off when you put the belt back on. Starting the bike without checking to make sure all your marks are lined up can result in valve damage!


  • Put slight pressure on the tensioner and tighten up the two bolts that secure the tensioner. Do NOT over tighten these bolts! 19 ftp is plenty.


  • Tighten up the crank bolt using your home made Honda tool or whatever method you wound up using. Crank bolt should be 59 ftp or just good and tight.


  • Take one last look at everything and then fire up the bike before putting dust cover back on.


  • If everything looks good reinstall dust cover and go for a ride!

Additional Pics

ValkyrieRiders.com   Message Board    ShopTalk    Just Pics    Valkyrie Hot Links